Monday, June 28, 2010

Product Reviews ::: Interior Decorating for Kids

I have been a bit obsessed with interior design ideas for the boys bedrooms and the playroom in the new house (about 4 months to go - excited much?!?!!?). I have found some really cool ideas and I wanted to share some of therm with you. I will try to include some girls things too, but I am naturally drawn to the boys things obviously!


I love Supprting Aussie Buisness....So, check out Mini Me Designs (an awesome QLD based company) on the web and on facebook for some delightful canvases/ plaques. I just love their animal images - gorgeous!!!


You can find Designer Mum here and find some wonderful 'kid style'

They put together some decorator packs which is a cool idea....
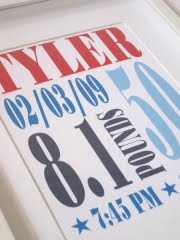
....but my pick from this website is the birth details plaque that is a nice, neat modern way of displaying the moment your precious bundle came into the world!!! LOVE it!!


If you love buying product online from Australian Small buisnesses that are run by Working at home parents, then a wonderful directory of all things including decorating supplies can be found here at Support A Working At Home Parent network (Support a WAHP). They have a website with a directory and a facebook page too.


Friday, June 25, 2010

Bannana 'icecream' with a difference.


Last night I tried a recipe for a healthy dessert that was met with rave reviews. I adapted the Banana Fluff recipe from the Better Health site mentioned in an earlier post. I followed their instructions, but added had some cream cheese (yoghurt would work too) that I had in the fridge which made it extra creamy. In retrospect though, I would freeze it longer next time.
Now I didn't tell my 4 year old that I made it untill I handed him an ice cream cone and said look, its a special banana ice cream! He said (looking suspicious)...."let me try it to make sure it is yummy" (he takes a lick) "ooooo mummy, thats delicious!" SCORE!!!!!

Thursday, June 24, 2010

Patterns With Buttons - Incidental playing/ learning :)


While my little man was napping the day before last, I cooked dinner and some cookies with my (almost) 4 year old boy. Whilst cookies were in the oven, I took the chance to have some teaching/ playing time with him. I got out a sheet that I quickly whipped up that looked like this and got a jar of buttons from my craft room. Then we spontaniously "played button games" (which I made up as we went). Some examples of these games are below:

* First I used the grid and put a red button in the first square, then a yellow one then red again (making a pattern of 2 colours: RED/YELLOW/RED/ YELLOW). Then we said the colours aloud together and he told me which one came next. Then I said "finish the pattern" and taught him what that meant. He placed buttons in the RYRYRY pattern to fill the grid.


* Then I did a pattern of three colours BLUE/YELLOW/ORANGE. So I put into the grid BLUE/YELLOW/ORANGE/BLUE......then he figured out he had to fill in the pattern by putting in the yellow then orange buttons squares and he kept it going to fill the 10 space grid.

* The circles we used for early addition skills. E.g. I have one in my circle. (1) How many in your circle? (1) Lets ADD them together 1 plus 1 = 2 buttons together.


* (CATEGORY/ ATTRIBUTE LEARNING). Choose your favourite button and put it into the circle (they might pick a green/ shiny/ big one). Ask them "why is that your favourite?" Whatever reason they state is the attribute they have notified in their button. So, lets see if we can find any other green buttons and put the others in the different circle.

The sky is the limit with this activity and there are so many things you can teach but because it's fun, they think they atre playing!!! I could fill this page with activity ideas, but I will spare you :)

Lauren x

Tuesday, June 22, 2010

Dessert Plate - Lemon/ Lime Tartlets with Red Wine Jelly with Raspberries

The dessert plate (sorry about the picture ... I took it VERY quickly on my phone before serving).


Recently I posted about a homemade pizza bar I used for a dinner party with 2 friends of ours. Well to follow that dinner, we reclined and then I served up a dessert plate which had a lemon and lime tartlet and a red wine jelly with berries. It was a lovely balance of flavours. Here are the recipes for the different componants.


Recipe for the Red Wine Jelly from taste.com.au
* I used a red wine I had in the house and not the specific one in the recipe.
* I used raspberries instead of blueberries.


Recipe for the Lemon / Lime tartlets (thanks to Donnay Hay - Modern Classics 2)

PASRTY
Ingredients:
2 cups plain flour
3 tbls caster sugar
150g cold butter, chopped
2-3 tbls iced water

Method:
1. Process flour, sugar and butter in a food processor until mixture resembles fine breadcrumbs.
2. While the motor is running add the water so it forms a smooth dough and process till just combined.
3. Knead lightly and wrap in cling wrap and refrigerate for 30 mins.
4. Roll out between baking paper or on lightly floured bench untill about 2-3mm thick.
5. Line the tart tins and gently prink base with fork and pop into freezer for 15 mins.
6. Blind bake for 10 mins on 180'C (with rice/ weights) and then without for a further 10 mins.


FILLING
Ingredients:
3/4 cup lemon juice
3/4 cup caster sugar
3/4 single pouring cream
3 eggs, lightly beaten

Method:
1. Reduce oven to 140'C.
2. Place lemon & sugar in heat proof bowl over saucepan of simmering water and stir until the sugar is dissolved.
3. Add cream and eggs and stir continuously for 5 mins.
4. Pass filling through strainer (VERY important).
5. Bake the tart for 20-25 mins or until the filling is just set. Cool completely and serve.


Enjoy :)
Lauren x

Monday, June 21, 2010

Homemade Pizza Dough


I have re-discovered recently how easy and fun it is to make pizza dough. I have made it with the kids and they loved it! I even had a couple over for a dinner party and I used this recipe to create a homemade pizza bar for them - it was a HUGE HIT. As they arrived, they were greeted with me rolling dough and 12 bowls lined up on the bench filled with various toppings from cheese, herbs, salami, capsicums, olives, fetta, potato etc...Whilst it was baking we enjoyed a galss of wine and appetizers. Delsih!
This is another stellar recipe from the team at taste. I chose this great pizza dough recipe as its cheap and easy. Its worked every time for me so far....I hope you try this one (please tell me if you enjoyed the recipe as much as we did).

Lauren x

Saturday, June 19, 2010

Cookies on a whole new level!!!!

Today's post is amazing. Fathers Day is approaching in the USA, so alot of the blogs from the states are all about gifts/ crafts for Dad. I am not going to tell you about all of these cookies.....you just have to check it out yourself :)


AMY ATLAS (via Eleni's NY)

Thursday, June 17, 2010

Some wonderful blogs :)

I have got to say that I have found some very interesting blogs of late and am loving how this platform allows people to share things with such a wide audience. Check out some of these wonderful blogs and get inspired with some projects and products for your world!

{click on images for the link}
....


This blog is done by a dear friend of mine. She has a real knack at finding trendy things before they become trendy. Check out the green living, craftiness and lots more at 'amy jean'.


Got little ones at home???? You'll LOVE 'counting coconuts'!!!


I have used this guy before on my blog - but if you love crafty projects that are modern and simple - you'll love 'made by joel'.


This blog is wonderful and adorable - sure to inspire you. Many crafty projects gallore!!!
LOVE it!!!


Enjoy;
Lauren x


Tuesday, June 15, 2010

Daniels 1st Birthday "Twinkle Twinkle" Party - Part Four

The final post in the birthday party series is the cake. I made a tonne of vanilla cupcakes which was the easy task. Then i made a buttercream and tinted it yellow. I had planned to pipe it so the fondant disc stood taller, but that didn't quite happen.
Then I tinted two lots of fondant one blue and one yellow (see a previous post for help with this).
I cut blue discs out and yellow stars. Then i used a tiny amount of water to glue them together and placed them on the buttercream icing.
They almost looked like they did in my head, so for a VERY novive cake decorator, I am fairly happy with the end result.


Tuesday, June 8, 2010

Daniels 1st Birthday "Twinkle Twinkle" Party - Part Two


One of the decorations I had my heart set on for Daniels birthday party was some pale blue/ yellow bunting. I wanted to make it but didn't have a sewing machine (at that point). I ended uip ordering it from a favourite website of mine - madeit.com.au. This is an Australian website with a whole bunch of people seeling things that they made. I bought it from a store called Mockingbird Designs which I was very impressed with. THe product was just perfect and they were a pleasuere to deal with and patient with all the delays for payment due to problems with our paypal accounts.
I definitley recommend popping around to have a look at their store....just delicious!!!!

Monday, June 7, 2010

Daniels 1st Birthday "Twinkle Twinkle" Party - Part Three


Why should the kids be the only ones who have the fun right??? So, I made the adults their own party favours. I made normal vanilla biscuits and tinted fondant icing a gentle shade of yellow. Then I packaged the star biscuits in cello bags and cardboard toppers just made it look so much cuter!

Tips:
* Bake biscuits and let cool.
* Using food prep gloves, put some food colouring drops into fondant icing and massage through with hands untill you get the colour you require....you can always add more colour, so do it slowly.
* Using icing mixture, roll out with rolling pin and use the same cookie cutter shape to cut out the icing shape.
* With pastry brush, dip lightly in water and brush a little water onto biscuit and place icing onto biscuit.
* Using your fingers, smooth edges and set aside to dry.
* Then I came across the cello bags to fit and measured cardstock to fit into a topper. Then to hide the staples, I punched stars in contrasting colour using punches from Stampin' Up.

Daniels 1st Birthday "Twinkle Twinkle" Party - Part One

I decided that I didn't want to give lolly bags for favours at Daniels party. So, I embarked on the journey of making these darling bean bag parcels for the kids with a card attached with Bean bag challenges. It didn't cost ver much to make, except in time of course.
I paced myself making all 38 of them! So here is a brief tutorial in case you want to do some yourself at home. I appologise for the poor lighting in some of the photos....the light in the room where I was sewing wasn't very bright.


I made a template out of cardboard and it measured 15cmx30cm. I decided to do it this way (rather than two 15cmx15cm squares) to lower the cutting needed.


Fold the material in half (make sure the pattern is inside) and iron flat.


This bean bag will be sewn twice which will give it extra strength. Place the sewing material on the machine with the folded side to the left. Start sewing from the opposite side to the fold about 2/3 way down.


Make sure you reverse stitch the seam at this point to reinforce. This is important as you will be turning the bean bag inside out on this seam, so it will weaken if you forget this step.


Sew right to the edge and leaving the needle in, turn the corners untill you get back to the side you started on.


When you get back to the starting side sew down leaving a gap from the starting seam and also reverese sew over that seam too. Cut the thread.


Cut the corners off the square. This will eliminate bulk when turning inside out.


Gently turn the bean bag insideout (right side out lol).

I used a chopstick to push out the corners so it is square. Then iron it flat again.


Then sew around the three closed sides. Then I placed a funnel in the hole and filled the bean bag about 3/4 full with rice or dried beans. Place 2-3 pins to stop the rice faling out and also to steady the seam. Sew up the last side and DONE!!! {in my case repeat x40 hehehe}. The end result?????


TAAA-DAAA!
I bundled up bean bags in to lots of 2 per kid and then tied it up with ribbon.
I also printed off a card entitled 'Bean Bag Challenges' and pop it in the bundle giving parents and kids ideas and games to play with the bean bags.

Homemade Chai Tea - yum!

I have been a little bit absent in blog land for this past week. I have been busy planning and throwing my son's first birthday party. I will be showing some of the projects I was working on for in the coming posts.
Well the madness has settled after the party. My usual monday routine of folding in front of a favourite tv show has taken to a new level tonight.

Here is something I stumbled across tonight. Now I LOVE the flavour of chai tea, but I am not so fond of the powder and syrup based ones so often served at cafe's.


I have JUST made the most delicious Chai on the stovetop. I used the ideas in "My favourite chai" and "Good chai recipe" altered the recipes a little as I wasn't interested in adding the fennel seeds and I don't like the ginger tatse in this particular dish. I just used cloves, cardomom pods, cinamon stick, peppercorns, vanilla, honey, tea and milk. It was delicious!


Click here for the site and enjoy ;)

Lauren x

Tuesday, June 1, 2010

Healthy recipes online that you'll love!


I found a great recipesite today. Want healthy recipes that give you nutrtional content and allow you to search for types of meals like lunchbox meals and desserts but also specifics like low salt, egg, dairy, gluten free etc...?
This very user friendly website is wonderful! I used this site today and made a banana loaf with no butter or oil and it was a hit for arfternoon tea!
This website is approved by independant health and medical experts & quality assured by the Victorian Government. I can definitley recommend these recipes for healthier eating for you and your family.

LinkWithin

Related Posts with Thumbnails