I had a BLAST wrapping gifts this year and here was my take on gift wrap for Christmas 2010.


I hope you have had a great Christmas and look forward to sharing some new and exciting projects for the blog in the new year.
Enjoy;
Lauren x


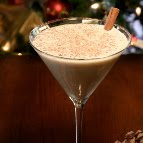
 Martha Stewart
 (recipe via taste.com.au)
Brush a 20cm (base measurement) square cake pan with melted butter to lightly grease. Line base and 2 opposite sides with non-stick baking paper, allowing it to overhang.
Combine the condensed milk, butter, sugar and glucose syrup in a medium heavy-based saucepan. Stir over medium-low heat for 3 minutes or until sugar dissolves. Increase heat to medium-high and cook, stirring constantly, for 10-15 minutes or until mixture thickens, turns a caramel colour and leaves the side of pan. Remove from heat.
Add the chocolate and liqueur, and stir until chocolate melts and mixture is smooth. Pour into the prepared pan and smooth the surface. Set aside for 1 hour to cool. Cover with plastic wrap and place in the fridge for 1 hour or until firm.
Remove fudge from pan, using the paper to help lift the fudge. Use a sharp knife to cut fudge into 16 equal portions.


 Almond and Rosewater Shortbread I loved this (and so did my girlfriends I had over for a craft night recently). I also had all ingredients except for the rice flour on hand in the pantry, so adding that to my shopping list for $1.30 meant this was very economical. I doubled the batch it was so delcious. This would also make a wonderful gift for school teachers, just bag or box up nicley and done!
Preheat oven to 160°C.
Spay 2 baking trays with oil to lightly grease or lay with baking paper.
Use an electric beater to beat together the butter and icing sugar mixture in a bowl until pale and creamy.
Add the almond meal and sift over the flours and ground cloves. Stir until well combined.
Use your hands to roll heaped tablespoonsful of mixture into 8cm long logs. Roll them into a ball first and then roll the logs so the ends are nice and rounded. Shape into crescents and place on prepared trays. THe mixture does spread so make sure to leave a few cm between them. I did try a few different designs (hearts, logs and crescents) but the mixture doesn't hold shape very well do do hearts, but the logs and crescents worked well.
Bake in preheated oven, for 20 minutes or until cooked through and light golden. Remove from oven.
Lightly brush shortbreads with rosewater essence and set aside on trays for 30 minutes to cool and firm.
Dust shortbreads with extra icing sugar.
Set aside for a further 30 minutes or until completely cool.

 So, I have been quiet on the crafty posts of late, because the last few months I have been perfecting 36 french knots, 36 satin stitches, over 11m of hand done lader stitching, a similar amount of running stictch and a bit of machine work for good measure. Creating what you ask? One of the first sewing projects I have ever done, and I dare say it'll remain a favourite for sometime, even though it's not for me to enjoy ;)


