Tuesday, August 30, 2011

{Freezer Meals & Making Life Organised}


You can tell spring is coming, the cleaning bug has hit (but maybe for me its an all year round thing). I cleaned out my freezer, did an inventory and created space.
I ashamedly had to remove a few 'mystery packages' too. This means unlabeled food which, knowing my label obsession, I clearly lost my mind before putting in there in the first place.


I was armed with my sharpie, big ziplock bags and foil trays with lids. Then I did a big food shop, put little munchkin to bed, left big munchkin with Lego and got into the kitchen.

I prepared a whole lot of meals that are easy to reheat and then all I have to focus on is adding fresh veggies and salads etc... To the main dish.

So what dishes did I make?

*Leek and Mushroom Risotto
When I defrost, I will add sone fresh parsley, Parmesan and pepper.

*Sweedish Meatballs
These were inspired by the ones I love at ikea. So all I have to do is add green veggies (like beans, asparagus and broccoli), gravy, cranberry sauce and mashed potato (could even freeze this, but I like fresh).

*Lasagna and 'Spag Bol'
I did a BIG batch of Italian style mince. Using foil trays with lids (woolies sell these in packets of 2) I made 2 lasagnas and put the other half of the mixture into a zip lock bag for 'Spag Bol'.

*Schnitzels / nuggets
I crumbed up 1 kg of chicken breast. I cut each Breast into half to get two thin schnitzels per breast. Any of the tenderloins I crumbed and packed separately as nuggets.

*Beef Burritos
I made up sone Mexican style mince. Add garlic, red onion, Mexican chilling powder (no additive and salt version of taco seasoning), corn, capsicums, mushrooms, coriander and a tin of diced/ pureed tomato.
Place into tortillas, fold up tortilla, wrap in double glad wrap and place all in a zip lock bag. Take one out and microwave for individual serve or use all and bake as normal 'enchilada style'.

*Teriyaki style Chicken
This was easy, I just filled a zip lock bag with soy sauce, some brown sugar, sweet chili sauce and kecap manais. Then put in chunks of chicken raw and freeze. This marinades it before cooking.
Serve with an Asian green stir fry and rice.

*Beef Curry
Similar to above, cut beef up and add into the bag with curry paste.
Add peas or preferred veggies when cooking and serve with rice and naan bread.

*Shredded BBQ chicken.
I got a free range bbq chicken and took all the meat off so I can use it in things like omelets quiches, pies, etc... Without much effort!


I realize zip lock bags aren't very 'green' but for me they work, because they store a big meal in a flat bag, making the most out of freezer space.
Just take a meal out of freezer and put it into the fridge at night it should be mostly defrosted by the next night's dinner time (depending on the dish). SO simple.

So that's my overview of my very productive day.
I am keen to try and keep this up as it is one busy day that has made the next 10 -15 meals preparation free!!! Love that!!!


Lauren x


- Posted using BlogPress from my iPhone

Thursday, August 25, 2011

{Christmas 4 month countdown}

My favourite time of year is quickly approaching. Sorry if I scare you by mentioning the "Christmas" word too early. I am not a quickly shop on midnight Christmas eve kinda gal.

I like organisation.
I like order.
I like planing.
I am a list queeen!

So i have lists going on ages before the 25th of December. Lists of gifts, menus, shopping lists, time line to-do lists, lists for anything! So, yesterday as the 4 month mark arrived, I found some pretties online and swooned for a while.

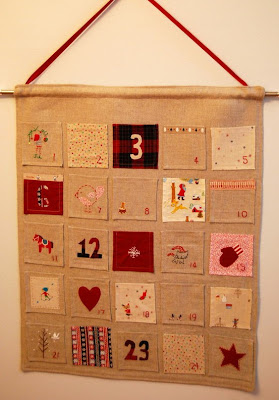
In my 12 days of Christmas countdown last year I dedicated a post to the beautiful advent calendar.
I have been re-inspired from Pinterest and with 4 months to go until Christmas I have plenty of time to plan ahead and make one for us this year. Now to decide on the design. I want to do it in fabric so that it is something that will last and I can pass on. This is just the tip of the iceberg though....there are so many homemade Christmas decorations I want to do this year, better get planning ;)

Linaloo

Inchmark


Green Jello


Frugal Home Designs


Ucreate (guest post by wippleberry)


The House of Smiths

There were so many other pictures and eye candy I could post.....so if you want some inspiration for this (or anything) get onto pinterest!

I would love to know if you created an advent calendar idea at your place and what kind of design you have, please link it up in the comments or on the facebook page if you have ;)

Lauren x


Saturday, August 20, 2011

{Homemade Ricotta Gnocchi}


I love a great recipe that is healthy, quick and easy! This has een on my to-try list for ages and I can't believe that this has taken me so long to try this.
Gnocchi.
Its one of those recipes that seems so mystical. So Italian and authentic.
So, I had some left over ricotta in the fridge after making
Cannelloni and I decided to try and use it and give ricotta gnocchi a go (not sure how it would turn out). It turned out to be a MASSIVE hit and everyone gave it a 2 thumbs up.
I was hoping it would be a success or baked beans was on the menu ;)
Here is a rough recipe (as usual I made it up as I went).
1/2 kg ricotta (the dry kind from the deli or that comes with a colander works best)
1 egg

1/2 tsp nutmeg
1/2 cup parmigiano regianno (parmesan is fine)
salt and pepper
1 cup of plain flour (can use rice flour to make it gluten free)

1. Place cheeses, spices and egg in a bowl and mix together.
2. Add 1/2 the flour and mix in. then add a little at a time until the mixture resembles a dough consistency.
3. Sprinkle some plain flour on the bench / board and roll out handfuls of the 'dough' into a thin sausage shape.

4. Cut off little bite sized pieces and set aside.

5. Repeat until the 'dough' mixture is all rolled and cut.

6. Boil salted water and place gnocchi in the water. They are ready when they rise to the top of the water and float. Take out immediately and place into your favorite sauce.


I simply fried some eggplant, onion, garlic, zucchini and a tin of tomatoes. Topped it with fresh basil, parmesan and freshly ground pepper to serve.
Enjoy; Lauren x

Friday, August 19, 2011

{Facial Scrub Gift Idea} Oatmeal & Cinnamon Scrub


I have been very lucky to have such a wonderful teacher for my little Mr. It has made it so easy for him to settle into prep school. So, I made her a little thank you gift. A homemade Oatmeal & Cinnamon facial scrub for a sweet teacher.

Quantities for below depend on the size of jar, but this was the ratio I used.
Ingredients:
1/2 cup of Oatmeal (I pulsed this up in my food processor so it was slightly finer than the raw oats)
1/4 cup rice flour
1 tsp cinnamon ground

Then this is put into a jar with the following instructions:

"When you want to make a facial scrub, just add 2 teaspoons of the mix to a bowl and add enough of a wet ingredient to make a paste.Good examples of wet ingredients are; egg yolk, fruit, honey, yoghurt or milk.You could use one wet ingredient or a combination such as banana and yoghurt.Apply the scrub to a damp face and gently massage into the skin in upward circular motions. Thoroughly rinse off with warm water and a cloth."
I hope you enjoyed this. This is the easiest and quickest to make for yourself or a gift. This is a natural product, but as with every new product, test it on a patch of your skin first ;)

Lauren x

Thursday, August 18, 2011

{Stuck for a Crafty Idea?}


I was wasting time....er....browsing on pinterest tonight and I stumbled upon a pic that linked to a blog post "Adventures in home-making : the worlds best sewing tutorials in no particular order".


If you are a crafter, love sewing like I do and are seeking inspiration, here are TONNES!!! Not that I need more projects to start as I have many on the drawing board/ back burner.....but I know I will refer to this in the near future!

Enjoy wasting time...I mean dreaming! ;)


Lauren x


Monday, August 15, 2011

{A trip to the treasure shop}

A new op shop opened near Mr.5's prep school and I have been longing to pop in for a browse. So toddy we went to the 'treasure shop' as it's been sweetly named in our house. I spent $11 and this was the loot I got.


A wooden Teddy puzzle for Mr 2, a set of steak knives (which we have never owned believe it or not), a giant table cloth (which I figured if it didn't fit our big table, then $2 fabric was a bargain) and 10 meters of brown paper!


An old frame I am repurposing into something fun (will show when it's finished).

And.......the final purchase which was half of my $11 was this:


So funny with the padded muscles - couldn't resist and it hasn't left his side! I sure am glad it cane without a mask as that spools his little brother more than anything!

So a very successful treasure shop trip. Especially considering I restrained myself from a gorgeous old wooden chair for $40! ;)

Anyone else love trawling op-shops for pre loved things??


Lauren x

Posted using BlogPress from my iPhone

Friday, August 12, 2011

{One Pot Orange Asian Chicken}

I kinda made this up as I went tonight, so feel free to adjust flavours i.e. add chilli etc... This went so quickly that I didn't even get a chance to get a photo. The dish fed 4 adults and 2 children. On top of that I had everything on the pantry and freezer already so it was a very cheap meal too!


ONE POT Orange Asian Chicken


Ingredients:

3 chicken breasts
(could use thighs, but this is what I had on hand)
1 onion chopped
3 cloves of garlic
1 cm piece of fresh ginger (minced in a jar is fine if you don't have fresh)
1/2 bunch of shallots chopped in chunks on an angle
1/2 capsicum (red or green) cut into thin strips
2 oranges juiced
1 tbls Kecap manis (thick sweet soy in Asian isle)

2 tbls soy sauce

1 tsp of white vinegar
1 tbls honey


Method:

Place all ingredients in an oven proof dish and bake in a 160' oven for about an hour.
Place 2 cups of Basmati rice and 2 cups of chicken stock in a microwave dish for 10 mins (your microwave may be different).
Serve!

How easy huh???

Enjoy;
Lauren x


Monday, August 8, 2011

{Guest Blogger from PLAID : Pinwheel Tutorial}


Here is a wonderful guest post from the very creative Kerryn from the newly published "Plaid" blog. Her blog is new so pop over to it and have a browse at her very crafty ideas and cute kids too ;) She wrote a fresh never-before-seen tutorial written for you and I have been very excited to share it with you! Here it is:


Thanks Lauren for having me here today at your fantastic blog!

I have been reminded recently of how beautiful and sweet pinwheels are. So, I decided to make a few and see what could be done with them. After seeing how easy they are to make I have decided that they will be the theme for my daughter's birthday party in October.

So, let's get to it...

To make a pinwheel you need the following supplies...
- scrap fabric
- fusible webbing
- iron
- fabric scissors
- hot glue gun or other glue
- bamboo skewer


If you’d like to put your pinwheel onto a card then you’ll also need...
- Card stock
- Stamps, ink, glue, buttons etc


1. Grab your fabric scraps and fusible webbing cut out 5cm squares of all

2. Fuse the webbing onto the wrong side of one of the fabrics, wait for it to cool, peel off the paper backing and fuse it to the wrong side of the second fabric. Trim away any frayed edges and you will be left with this...


3. Cut 4 slits in the square starting from each point on the square. This doesn't have to be too exact, just make sure there is a section in the centre of the square in-tact.


4. Trim away a small section of the corners. This will make sure the centre of your pinwheel is neat.

5. Get your glue gun and place a dot of glue in the centre. Take one of the trimmed corners and glue to the centre of the square. Repeat this for all 4 trimmed corners using a dab of glue each time.


6. Cut off a section of the bamboo skewer and glue it to the back of the pinwheel. You can finish the pinwheel off with a cute button.


7. Now get some matching cardstock out and embelish / cut / stamp away until your happy, then glue the pinwheel on. I have used tombow craft glue to attach the pinwheel.

Ta Da!!! One very cute pinwheel card...


Now go forth and make pinwheels :)

Thanks again Lauren for having me here today!

Your welcome Kerryn. Thanks for sharing that gorgeus pinwheel tutorial! I am definintley going to try some soon ;)

Thursday, August 4, 2011

{Quick and Tasty Pasta Dinner}


This meal is a favorite of mine for those nights where you don't have a lot of time. This is so quick, easy and packed full of flavor. As an added plus I have these ingredients on hand always so I can whip it up at a moments notice.

Ingredients:
Wholemeal spaghetti
Tin of diced tomatoes
2 Jars of antipasto (in the oil isle)
Juice of 1/2 a lemon
Parmigano reggiano cheese*
Parsley to garnish

Method:
1. Boil spaghetti
2. Drain antipasto and roughly chop up (this is all about rustic so you don't have to be precise)
3. Once spaghetti is cooked, drain in colander and put back in saucepan (keep off the heat). Add antipasto, tinned tomatoes, 1/2 lemon squeezed, and a heathy grating of cheese.
4. Toss through 1/2 bunch parsley and some freshly ground pepper and serve warm.

Enjoy!

Mr 5 requested this cold in his lunch box today so, to me that's a winner!!!

*This cheese whilst pricier than tasty but has a very strong flavor as it's aged for about 2 yrs. This means you use less calories to get your taste. Finley grated with a hand grater is the way to go! Could also use Parmesan.

Lauren x


Posted using BlogPress from my iPhone


Tuesday, August 2, 2011

{A Sweet Housewarming Gift Idea}

Well some very good friends of ours are moving this week. I wanted to give a gift that would help the family celebrate the first night in their new house as a family.

So, I put together a "Build-a-Dessert Kit" for them to create a special memory in their new house.


It consisted of:
*Waffle cones and bowls
*Choc, Berry and Caramel Sauces
*Marshmallows
*Crushed nuts
*Flake Bars
*Cherries
*Mini m&m's
*Gummy Bears
*Coloured and Choc sprinkles

Each bag or jar was labelled and the instructions are simply "just add ice-cream".

The jars I used for the sauce were re-purposes antipasto jars I used in a pasta sauce.

I could see this as a birthday dessert kit too and many other variations possible. I would love to hear if you try this or create another variation.

I hope you enjoy this idea,

Lauren x


Posted using BlogPress from my iPhone
Monday, August 1, 2011

{One bag two ways}

Regular readers may have noticed me posting a picture of the first handbag I made recently.
Since I loved the pattern so much I decided to make it for two up coming birthdays. The first one will look similar to first as it was also for a 6 year old girl. However this time I added a detachable flower clip and a personalised appliquéd Tshirt.


Since the second bag was for a friend of mine, I changed the fabric (so in love with this material - now going to make one for me), added a small internal pocket and shortened the handle. I also added a decorative stitch on the handle that helped keep sone padding in place.


I have a larger version of this pattern and another large pattern I want to play with too.
Can't wait!!!

Lauren x

Posted using BlogPress from my iPhone

LinkWithin

Related Posts with Thumbnails