A dear friend of mine is expecting her miracle princess soon. We celebrated her baby shower this past weekend. It was a beautiful afternoon catching up with friends, laughing, enjoying delicious pink food and drink. It was divine and precious. This precious princess already is very well dressed and has so many cute shoes and accessories before she has made her grand entry to the world. My beautiful friend (center) is the one expecting soon. Here she is with me (left) and another of our friends (right) whom decorated the whole pink affair with effortless style as she is known to do!
A special arrival deserves a special gift. I tried my hand at quilting and I had SO much fun. Albeit without some of the tools which would have made it somewhat easier (i.e. a walking foot). Hopefully I can acquire one soon before my second quilt attempt.
Showing posts with label craft ideas. Show all posts
Tuesday, April 16, 2013
Wednesday, December 5, 2012
{Extra Special Twinkle Lights}
So, December is in full swing and I hope your enjoying adding touches of festivity to your house. I have been a bit busy over here working on a special project that I can reveal soon, but can share a simple craft that added something special to our staircase this Christmas.
Materials:
- 1 length of Christmas lights.
- 3m of stiff tulle in your choice of colours (I chose red and white). I got mine for about $2 per meter.
- Craft scissors.
Materials:
- 1 length of Christmas lights.
- 3m of stiff tulle in your choice of colours (I chose red and white). I got mine for about $2 per meter.
- Craft scissors.
Labels:
Celebrations,
Christmas,
Craft,
craft ideas,
crafting,
party decorations,
twinkle lights
Wednesday, November 21, 2012
{Preschooler Craft Day}
Yesterday I had one of 'those days' with my three year old. If you have had a three year old, I know you are on the same page right now. Mister mischief just seemed to wake up on the wrong side of the bed and the day followed suit until he crashed at 6:00!
I was determined to not repeat this performance. Once the kids went to bed, I had a cuppa, took a breathe and decided to plan craft day. I visited the only place open after normal hours, my local Kmart.
These kits were $5 each and such great value!!
DIY Cars

The great thing is that there is no glue needed, as they are all adhesive stickers. So, no sticky mess! There is plenty of opportunity to practice fine motor skills. There were a tonne of stickers left over, so just print off some plain car templates and you can keep the fun going.


He was so proud of himself and has been playing with them ever since! We might try this one later today also:

Can definitely recommend to have these on hand for an easy preschoolers craft. I think my 6 year old would even enjoy this!
Lauren x
I was determined to not repeat this performance. Once the kids went to bed, I had a cuppa, took a breathe and decided to plan craft day. I visited the only place open after normal hours, my local Kmart.
These kits were $5 each and such great value!!
DIY Cars
The great thing is that there is no glue needed, as they are all adhesive stickers. So, no sticky mess! There is plenty of opportunity to practice fine motor skills. There were a tonne of stickers left over, so just print off some plain car templates and you can keep the fun going.
He was so proud of himself and has been playing with them ever since! We might try this one later today also:
Lauren x
Labels:
cheap play ideas,
Craft,
craft ideas,
Fun,
indoor fun,
Kids,
kids activities,
kids craft,
preschooler
Tuesday, October 9, 2012
{I love you because}
I have many things on my pinterest boards that are projects on my to - do list. This is one I can tick off my list. It is a sign I have put in between our vanity mirrors in the bathroom. I have seen a few style variations on this sign before. You can always create your own on and print it out.
However, i loved the chevron pattern i found on this one {here} and it was a FREE printable. There are also different colour schemes available to choose from. Just mount the frame somewhere you both see it with a whiteboard marker (normal sharpies don't work without windex or elbow grease - hint hint)!
I had all the things for this at home except for the whiteboard marker which set me back a whopping $3! Great value!
I love that this provides a cute opportunity to share things you love about your other half and It may even help you to look more intentionally for things if this doesn't come natural to you. I find that it's important to appreciate the small things in life - one day you will realise they were in fact the big things!
Lauren x
However, i loved the chevron pattern i found on this one {here} and it was a FREE printable. There are also different colour schemes available to choose from. Just mount the frame somewhere you both see it with a whiteboard marker (normal sharpies don't work without windex or elbow grease - hint hint)!
I had all the things for this at home except for the whiteboard marker which set me back a whopping $3! Great value!
I love that this provides a cute opportunity to share things you love about your other half and It may even help you to look more intentionally for things if this doesn't come natural to you. I find that it's important to appreciate the small things in life - one day you will realise they were in fact the big things!
Lauren x
Labels:
craft ideas,
crafting,
i love you because,
Love,
pinterest,
relationships
Wednesday, September 19, 2012
{A SUPER Birthday for Mr. 3}
I love how when you get married your family automatically enlarges. In my case (thanks to my husbands large family) I not only doubled my family, I probably tripled or quadrupled it! One of his cousins in particular we get along with very well. When their little man turned three recently, I was excited to put a twist on a gift I'd crafted before (read here) to help him celebrate.
I made the cape similar to what I have made several times by now. However, this time I made a mini version for his favorite toy. The little 'L' is for his toy lamb "Lambie". Isn't it just darling! My boys are so jealous that I now have two capes for my boys and two for their teddies on order and in progress - lol!
Here is my little 'Mr 3' posing for the camera to show it to you with his little lambie friend.
Reports in from the birthday boy, and this gift was a total hit! Maybe one of these days I might figure out how to be clever and put a pattern on here ;)
Lauren x
I made the cape similar to what I have made several times by now. However, this time I made a mini version for his favorite toy. The little 'L' is for his toy lamb "Lambie". Isn't it just darling! My boys are so jealous that I now have two capes for my boys and two for their teddies on order and in progress - lol!
Here is my little 'Mr 3' posing for the camera to show it to you with his little lambie friend.
Reports in from the birthday boy, and this gift was a total hit! Maybe one of these days I might figure out how to be clever and put a pattern on here ;)
Lauren x
Labels:
birthday,
Craft,
craft ideas,
gift ideas,
gifts,
Kids,
personalised gifts,
sewing,
super capes
Friday, March 30, 2012
{Easter's a comin'!}
It's no secret to my family that I love to celebrate holidays and occasions. Whether it's Christmas, Valentines or in this case Easter...I love decorating with themed touches, and sharing a meal with those we love.
I have not really done many decorations For Easter in the past, but this year I couldn't resist. It all started with inspiration from this beautiful wreath.
So, here are a few things around our house that help to add the 'festive cheer' of this very special and significant calendar date.

I have not really done many decorations For Easter in the past, but this year I couldn't resist. It all started with inspiration from this beautiful wreath.
So, here are a few things around our house that help to add the 'festive cheer' of this very special and significant calendar date.
Labels:
Celebrations,
craft ideas,
crafting,
decorating,
easter,
holidays,
party favours
Tuesday, March 13, 2012
{NO Mess Golf Ball Painting}
Today after school the boys really wanted to do some painting. Since I have about 3.5 hrs after school to get home, play, dinner, bath time and then bed....painting isn't usually on the agenda.
However, they seemed extra keen and so I thought I'd try something I saw on play-school yesterday which seemed to be A LOT less messy than the inevitable finger-painting mess I envisaged.
Need:
-Sheets of paper
-1 cardboard box (large enough for paper to fit in base)
-Paint
-2-4Golf Balls (this is what they used on play-school and we had many around the house after daddy's golfing trips...could probably use any other small balls or objects (experiment with what you have).
-A bowl with water and towel to wash after seen colours.
1. Place paper in bottom of box
2. Squirt dots of paint onto paper.
3. Place golf balls (or similar) into box and roll around.

We were all sitting in the grass outside together and we also closed the box up and shook it taking turns. Opening up the box once we had all shaken it was like Christmas morning with the suspense and surprise!
The boys also held a side each and rolled it back and forth. They had so much fun they didn't realize they were sharing....happily lol!
These were the results....they turned out so well. And NO mess at all!!!!

Lauren x
However, they seemed extra keen and so I thought I'd try something I saw on play-school yesterday which seemed to be A LOT less messy than the inevitable finger-painting mess I envisaged.
Need:
-Sheets of paper
-1 cardboard box (large enough for paper to fit in base)
-Paint
-2-4Golf Balls (this is what they used on play-school and we had many around the house after daddy's golfing trips...could probably use any other small balls or objects (experiment with what you have).
-A bowl with water and towel to wash after seen colours.
1. Place paper in bottom of box
2. Squirt dots of paint onto paper.
3. Place golf balls (or similar) into box and roll around.
We were all sitting in the grass outside together and we also closed the box up and shook it taking turns. Opening up the box once we had all shaken it was like Christmas morning with the suspense and surprise!
The boys also held a side each and rolled it back and forth. They had so much fun they didn't realize they were sharing....happily lol!
These were the results....they turned out so well. And NO mess at all!!!!
Lauren x
Labels:
craft ideas,
Kids,
kids craft,
painting
Tuesday, February 14, 2012
{Pasta Play : And Other Cheap Toddler Fun}
All this funny Sydney weather has left me many times with a very active toddler at home whilst it's raining outside. Here are SOME of the ways I have kept him amused lately. I have had to get creative as he is a smart kid, but needs to burn energy and get creative and change activities frequently!
1. Pasta Play:
I started simply by putting 5 pasta noodles on one plate, handing him another empty plate and some mini tongs. No instructions, just let him play and count.

2. Spaghetti Tower: Then I blu-taked a spaghetti strand to a plate and he started building them up counting as he went. He was enjoying this more than I thought.


Of course my son found a way to make a mess (he is an expert there) and do we turned cleaning into another game (I know I may have a shelf life for this lol)!

Then we got s break in the sun so we decided to try car painting. Combining cars and mess = BIG hit for my little one.
1. Find old or cheap cars you don't mind getting painted.
2. Let them paint the wheels and watch on some paper as the tyres make rainbow tracks.
3. Then put done warm soapy water in a bucket and have a "car wash" to clean up ;)

There are a few other things I will share soon that don't cost the earth. If you have any other ideas - feel free to share them here or on facebook or twitter :)
Lauren x
- Posted using BlogPress from my iPhone
1. Pasta Play:
I started simply by putting 5 pasta noodles on one plate, handing him another empty plate and some mini tongs. No instructions, just let him play and count.
2. Spaghetti Tower: Then I blu-taked a spaghetti strand to a plate and he started building them up counting as he went. He was enjoying this more than I thought.
Of course my son found a way to make a mess (he is an expert there) and do we turned cleaning into another game (I know I may have a shelf life for this lol)!
Then we got s break in the sun so we decided to try car painting. Combining cars and mess = BIG hit for my little one.
1. Find old or cheap cars you don't mind getting painted.
2. Let them paint the wheels and watch on some paper as the tyres make rainbow tracks.
3. Then put done warm soapy water in a bucket and have a "car wash" to clean up ;)
There are a few other things I will share soon that don't cost the earth. If you have any other ideas - feel free to share them here or on facebook or twitter :)
Lauren x
- Posted using BlogPress from my iPhone
Tuesday, October 11, 2011
{Menu Chalkboard}
A few months ago I went to the treasure shop with my boys and I bought a frame that I wanted to re-use. The frame cost me a few dollars.
I saw potential in this discarded old thing.
With a little bit of black board paint left over from another project and some bright red cherry paint on the frame, I made this board to put up the menu for the week. It sure beats the handwritten paper on the fridge. My family love knowing hats coming up too!
Enjoy;
Lauren x
Labels:
blackboard,
craft ideas,
crafting,
green living,
menu planning,
re-use,
recycling
Wednesday, October 5, 2011
{Bib and Nappy Mat/ Storage Wallet}
My beautiful cousin (in-law) is expecting a beautiful baby girl in a few weeks. I am very excited for her and now that I have given the gift to her in person, I can share it on here.
I had some beautiful girls fabric I bought previously and I wanted to use it for this project.
So I made a bib and a nappy change mat with storage compartments for her. Nothing like practical and pretty! I love this idea so much and would make one for me if I wasn't about to head out of nappies (YAY!!!)
The teddy is the closest thing I have to a doll in a boy house to show you how the mat works and how the bib sits.

This 'crinkley' heart is stuffed with a cellophane type material and built in so that the baby has something to play with whilst Mummy is trying to wrangle a new nappy onto a little bubba.
Both projects were manageable even for a beginner.
Bib
1. Trace a bib pattern from one or there are a few online you can find if you don't have one on hand.
2. Pin right sides together.
3. Make sure you place the string/ ribbon to tie it up inside the bib, leaving a little out to anchor it and the length inside. You can also use velcro after you've turned it instead.
4. Sew around the edge leaving a little gap (back stitched) to turn inside.
5. Turn out the right way and top stitch around the edge making sure you enclose the gap you left to turn it out.
Nappy Mat
1. Measure out your two rectangles
2. Sew face side of fabric together with a gap on the side (back stitched) to turn right side out.
3. Iron flat
4. Measure size of pocket and fold and pin in place. Top stitch around edge using a decorative stitch (don't forget to put the ribbon and toy in the pocket fold if doing so).
5. Sew a divider in the center of the pocket for nappy and wipes case.
6. Sew a ribbon, some velcro or something to fasten and hold together.
Enjoy,
Lauren x
p.s. I hope you like the new blog logo! I have felt like a change for a while but waited for the right idea. I loved the toffee apple as it is a mix of healthy and sweet. We eat healthy here, but as someone who enjoys baking, treats are a fun thing to enjoy.
I had some beautiful girls fabric I bought previously and I wanted to use it for this project.
So I made a bib and a nappy change mat with storage compartments for her. Nothing like practical and pretty! I love this idea so much and would make one for me if I wasn't about to head out of nappies (YAY!!!)
The teddy is the closest thing I have to a doll in a boy house to show you how the mat works and how the bib sits.
This 'crinkley' heart is stuffed with a cellophane type material and built in so that the baby has something to play with whilst Mummy is trying to wrangle a new nappy onto a little bubba.Both projects were manageable even for a beginner.
Bib
1. Trace a bib pattern from one or there are a few online you can find if you don't have one on hand.
2. Pin right sides together.
3. Make sure you place the string/ ribbon to tie it up inside the bib, leaving a little out to anchor it and the length inside. You can also use velcro after you've turned it instead.
4. Sew around the edge leaving a little gap (back stitched) to turn inside.
5. Turn out the right way and top stitch around the edge making sure you enclose the gap you left to turn it out.
Nappy Mat
1. Measure out your two rectangles
2. Sew face side of fabric together with a gap on the side (back stitched) to turn right side out.
3. Iron flat
4. Measure size of pocket and fold and pin in place. Top stitch around edge using a decorative stitch (don't forget to put the ribbon and toy in the pocket fold if doing so).
5. Sew a divider in the center of the pocket for nappy and wipes case.
6. Sew a ribbon, some velcro or something to fasten and hold together.
Enjoy,
Lauren x
p.s. I hope you like the new blog logo! I have felt like a change for a while but waited for the right idea. I loved the toffee apple as it is a mix of healthy and sweet. We eat healthy here, but as someone who enjoys baking, treats are a fun thing to enjoy.
Labels:
baby,
craft ideas,
crafting,
fabrics,
gift giving,
gift ideas,
homemadebylauren,
Kids,
sewing
Thursday, August 25, 2011
{Christmas 4 month countdown}
My favourite time of year is quickly approaching. Sorry if I scare you by mentioning the "Christmas" word too early. I am not a quickly shop on midnight Christmas eve kinda gal.
I like organisation.
I like order.
I like planing.
I am a list queeen!
So i have lists going on ages before the 25th of December. Lists of gifts, menus, shopping lists, time line to-do lists, lists for anything! So, yesterday as the 4 month mark arrived, I found some pretties online and swooned for a while.
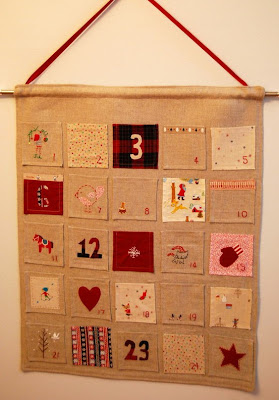
In my 12 days of Christmas countdown last year I dedicated a post to the beautiful advent calendar.
I have been re-inspired from Pinterest and with 4 months to go until Christmas I have plenty of time to plan ahead and make one for us this year. Now to decide on the design. I want to do it in fabric so that it is something that will last and I can pass on. This is just the tip of the iceberg though....there are so many homemade Christmas decorations I want to do this year, better get planning ;)
Linaloo
Inchmark
Green Jello
Frugal Home Designs
Ucreate (guest post by wippleberry)
The House of Smiths
I like organisation.
I like order.
I like planing.
I am a list queeen!
So i have lists going on ages before the 25th of December. Lists of gifts, menus, shopping lists, time line to-do lists, lists for anything! So, yesterday as the 4 month mark arrived, I found some pretties online and swooned for a while.
In my 12 days of Christmas countdown last year I dedicated a post to the beautiful advent calendar.
I have been re-inspired from Pinterest and with 4 months to go until Christmas I have plenty of time to plan ahead and make one for us this year. Now to decide on the design. I want to do it in fabric so that it is something that will last and I can pass on. This is just the tip of the iceberg though....there are so many homemade Christmas decorations I want to do this year, better get planning ;)
There were so many other pictures and eye candy I could post.....so if you want some inspiration for this (or anything) get onto pinterest!
I would love to know if you created an advent calendar idea at your place and what kind of design you have, please link it up in the comments or on the facebook page if you have ;)
Lauren x
I would love to know if you created an advent calendar idea at your place and what kind of design you have, please link it up in the comments or on the facebook page if you have ;)
Lauren x
Labels:
Celebrations,
Christmas,
craft ideas,
crafting,
decorating,
fabrics,
party decorations,
sewing
Thursday, August 18, 2011
{Stuck for a Crafty Idea?}
I was wasting time....er....browsing on pinterest tonight and I stumbled upon a pic that linked to a blog post "Adventures in home-making : the worlds best sewing tutorials in no particular order".
If you are a crafter, love sewing like I do and are seeking inspiration, here are TONNES!!! Not that I need more projects to start as I have many on the drawing board/ back burner.....but I know I will refer to this in the near future!
Enjoy wasting time...I mean dreaming! ;)
Lauren x
Labels:
Craft,
craft ideas,
crafting,
gift ideas,
pinterest,
sewing
Subscribe to:
Posts (Atom)