Showing posts with label cooking. Show all posts

Sunday, March 22, 2015

{Sugar Free Chia Jam}

This month, March, is celebration month in our house. We have had a lot of food, a lot of sugar and a lot of quick & easy meals on busy nights whilst hubby travels or whilst we recover from my sons surgery.
I'm feeling it too. I feel bloated and just that heavy feeling. I need to kick my butt into gear. 

It's time to get back on the wagon of eating clean, cutting out refined sugar and feeling myself again. I fell off the wagon hard this month...in fact I don't even know where the wagon is! 

Whilst grocery shopping on the weekend, I picked up a bargain bulk buy of strawberries. 
Then we had a beautiful cool change come through with some rain and I love being in the kitchen in that type of weather. 
I felt inspired to create some sugar free chia jam that I pinned ages ago. 


Ingredients:
3 cups berries (fresh or frozen)
3 tablespoon sugar free maple syrup or rice malt syrup
3 tablespoon water
5 tablespoon chia seeds 
(I added a split vanilla bean, cinnamon quill and some lavender flowers)

Directions: 
1. Place berries, water, syrup and chia seeds in a blender/ processor. 
2. Once it's blended, place in a saucepan on a medium heat until mixture bubbles. 
Reduce the heat to low and stir for a few minutes until thickened. 

3. Store in the fridge in an airtight container for a week. 


Ideas for use (some suggestions may defeat the purpose of a healthy sugar free diet - hehe):
1. Serve on freshly baked scones with whipped cream.
2. Spread on warm buttery toast.
3. Use it to turn a vanilla biscuit recipe into jam drops. 
4. Make healthy pancakes (1banana and 1 egg) and top with 'jam' and Greek yoghurt.


Sunday, June 16, 2013

{Cookbook Obsessed}


One of my favorite things to do is just sit with a cuppa and a selection of cookbooks from my collection and just flip! (A few of my favorites are pictured above).

Cooking has always been and will always be a favorite thing of mine to do. I've described it before as a kind of edible artform. I love experimenting and playing, finding new ingredients, techniques and flavor combinations. Letting me loose on the kitchen is I suppose my version if therapy.

Today is a kid free morning for me, so I am taking a moment to browse my collection. A time to get inspired and add something new to my 'to try' list.

I know I have a tone of books, but to me you can learn so much about a culture, location and an era just by looking at what and how the food is/ was prepared. It is a fascination of mine that borders on an obsession and I am on the hunt to find some old vintage cookbooks to add to my collection (antique road trip anyone? lol).


Q: Do you like to browse cookbooks too? What cookbooks do you love having in your home?


Lauren x

Monday, September 3, 2012

{Smoked Salmon Bites : Bring a Plate Idea}

Well, Spring is here! I have already seen some of the blooms around Sydney streets. It wont be long till we all start sunning our selves and being social again as the daylight stays around for longer. This time of year is great, kitchen teas, baby showers and lunches with family and friends keep our BBQ's and Aussie decks very busy.

Have you ever been invited somewhere for a morning tea or something where it's 'bring-a-plate' and you aren't sure what to bring?

This is the simplest thing to make and it looks VERY impressive. 

Smoked Salmon Bites

1. Make up a basic pikelet batter and I usually omit the sugar from recipe and add a pinch of salt. You can get fancy and make buckwheat pikelets, or add garlic to the mixture etc... I just keep it simple. 
2. Once you have cooked the batch of pikelets, let them cool and then spread with cream cheese.
3. Find a small round cookie cutter to make the shapes bite-sized and uniform in shape. 
4. Top with a ribbon of smoked salmon, sprig of dill, lemon zest and salt&pepper.
5. VOILA!!! So simple and easy to create that WOW factor for your next BBQ or afternoon tea. 

Lauren x

Thursday, July 5, 2012

{Dude Food for Origin}

Last night was State of Origin. I am not normally a football fan, however, I always watch origin. I love it (except when the blues go down AGAIN!). 
Hubby and I had a few of his mates over for game 1 and 3 and last night was a big match.
So, a BIG dude food menu was in order. I love brainstorming this stuff with my brother and we came up with this idea:

- Mini Cheeseburger Sliders with a Homemade Brioche Bun
I just made mini rissoles, with a 1/4 slice of colby cheese melted on each, tomato, rocket and ketchup/ mustard.
- Beer Battered Onion Rings  
First time making these and was hoping they'd turn out. BIG SUCCESS!!!
Beer-battered onion rings
{image from recipe...seen my attempt below lol!}

- Steak Fries  
(These I just cooked and kept warm in the slow cooker as an additional side / security in case the onion rings didn't work).

Recipe for the Brioche was inspired by {this} but I found it slightly confusing so I'll have re-typed it below. 

Tuesday, April 3, 2012

{Happy Easter Cake Pops}

Well, I wanted to say thank you to some very special teachers and friends that are a blessing to my boys.

This was the kind of activity that I did most of the prep for myself. Had my kids been slightly older, they could have helped with more than pouring the sprinkles on. But I just loved these do much, and was very happy with how they turned out!

If you need more detailed steps, click here for a good tutorial.

Basically it's done in less than 10 steps:


{My Mini Kitchen Apprentices}

I found these salad knives at Victoria's Basement recently for a few dollars ($2.50 from
memory) and knew they would be a big hit on two levels.


Firstly I was able to get their favourite colours (Orange for our big boy and 'Lello' for junior).
Secondly, our boys love to help and especially in the kitchen. Cooking is a big part of our house. These salad knives are shaped like a chefs knife, only it's a plastic aerated blade. Much safer.

Tuesday, March 27, 2012

Thai Sweet Chili Chicken Rissoles with Coconut Infused Rice

So, browsing on my iPad last night, as I do frequently, I read the latest "SuperFood Ideas" Mag. This ap is great on the iPad because of the cooking mode and video tutorials. I have actually added many recipes to our family menu from this publication. Worth checking out on your 'newsstand' ;)


I was immediately taken by the cover recipe and decided to give it a go tonight.


These were DELICIOUS and they packed a punch of flavor!!!!! Instead of salad, I boiled some rice in coconut milk and infused it with some coriander. I used absorption method and when I turned the heat off and put the lid on, I popped a small bunch of coriander on the top to steam gently into the rice!

Oh my goodness!!! Seriously try this meal, a definite hit, and now I can't wait to eat these cold on a salad for lunch tomorrow. YUM!


Lauren x

Friday, February 17, 2012

{Free Form Pumpkin and Spinach Lasagna}

I was HANGING to make this recipe like you have no idea! Not because I just saw a recipe for it like often inspires me. But because every now and then when I cook, I have my mojo ON and I don't have a recipe, I actually have no idea what the final outcome will be or look like when I start, but it just works. This was one of those times. I made it up as went and it was tastier than I thought it was going to be! The best thing was that this ended up like a restaurant dish and I bough everything from Aldi or had it in my pantry.

The downside is I don't measure when I cook like this, but here is my attempt at documenting this delicious dish :)


Ingredients: (made 3 large portions)
1 packet fresh lasagna sheets (you'll only need 1/2 packet and if you normally buy dried, its worth splashing out for the fresh sheets)
1/2 butternut pumpkin
1 packet of baby spinach (buy 2 if you want some for a side salad/ garnish)
2 cloves garlic
about 40g butter
handful of pine-nuts
handful of walnuts
1 tub of ricotta
Parmesan cheese
salt and pepper


Method:
1. cut your butternut pumkpin into thin slices (about 2mm *ish) and pop into water and microwave for a few mins until tender.
2. Place butter, spinach, nuts & garlic in a saucepan on a medium heat and saute till spinach wilts. Season with S&P and turn off heat.
3. Once the spinach mix and pumpkin is cooked you are ready to assemble.
4. Cut each lasagna sheet into thirds (Aldi's sheets are folded into thirds, so I just followed the folds). Here are my layers in order:
-Place one sheet as the base.
-Then lay a few pieces of the cooked pumpkin on top and season here
-another sheet of lasagna
-then spoon some ricotta on top
-sprinkle some parmesan on the ricotta
-then a spoonful of the spinach mix on top
-lasagna sheet
-spoonful of ricotta
-another layer of pumpkin
-final layer of lasagna sheet
-top with more ricotta, parmesan and s&P

You don't need much of each ingredient on each layer, it's the layering itself that will make each mouthful taste so good.


It sounds like a very long process, but even with doing 3 of these, it took me longer to write this than do it. It's worth it!


Thursday, February 16, 2012

{Carrot Cake}

I was craving carrot cake the other day and I have to say this was such a delicious recipe. I have doubled the spices here as I was after a 'spiced cake' type taste. I often like more ginger than recipes call for too.


Ingredients:
1 1/4 cups brown sugar
3/4 cup vegetable oil (or other tasteless oil i.e. not olive oil)
3 eggs
1 1/2 cup plain flour
1 1/2 tsp baking powder
1 tsp baking soda
2 tsp cinnamon ground
1 tsp ground ginger
2 1/2 cups grated carrot (I just grated 3 carrots)
1/2 chopped pecans (walnuts would also work - can be omitted for allergy purposes)
1/2 cup sultanas (I omitted these by choice)

Method:
1. Pre-heat oven to 180'C
2. Place sugar and oil in bowl of an electric mixer for a few minutes.
3. Add the eggs one at a time and beat well.
4. Sift the flours, powders and spices over the sugar mixture. Add the carrots and nuts and stir until just combined.
5. Pour your mixture into a greased cake tin. I used a silicon loaf 'tin'.
6. Bake for about 50 mins or until cooked when using the 'skewer test'.
7. Serve warm or cool completely before adding cream cheese icing.


I left the cake covered overnight and I had some for morning tea the next day. This was so moist, full of taste. It didn't need the cream cheese icing, it was delicious as a spiced loaf on its own.
SO good, just like my grandma used to make!


Lauren x


Tuesday, January 24, 2012

{Ricotta Brioche}


I discovered this recipe a while back and today was the perfect weather to make it. Even though it's summer - the weather screams winter baking to the tune of raindrops outside. For afternoon tea on a cool day, instead of baking scones, try this recipe for a twist with your cuppa tea. It's not a quick recipe, but it is a soft and fluffy treat that screams for butter and jam spread on top.


Ingredients:

500g Plain white flour
1/2 Tsp Salt
40g Castor sugar (+ 1Tsp)
2 Eggs (~53g) and 1 egg yolk (for the glaze)
160g Ricotta cheese
2 1/2 teaspoons Dried yeast
80-100ml Tepid milk (or more if needed)

Method:

1. In a big bowl, mix together the flour and salt.
2. In a small bowl, sprinkle the dehydrated/dried yeast into the milk mixed to 1 teaspoon sugar.
3. Leave for 5 minutes and then stir to dissolve.

4. Make a well in a centre of the flour and pour in the yeasted water.
5. Use a wooden spoon to draw enough of the flour into the yeasted water to form a soft paste.
6. Cover with a tea towel and leave to "sponge" until frothy and risen, about 20 minutes.
7. Beat the eggs with the sugar.
8. Add the ricotta and beaten egg mixture to the flour well. Mix in the flour to form a soft dough.

9. Turn the dough out onto a well-floured surface and knead until smooth, shiny and elastic for about 10 minutes.
10. Put the dough in a buttered bowl, turning to coat evenly with butter. Cover with a tea towel. Leave to rise until doubled in size, about 1 1/2 to 2 hours.
11. Knock back the dough, then leave to rest for 10 minutes.

12. Divide the dough into five equal pieces and then roll each piece into a ball.
13. Form a brioche (as on my pictures) with the balls.

14. Place on a baking sheet and cover with a tea towel.
15. Prove until doubled in size, about 30-45 minutes.
16. Preheat the oven to 180° C.
17. Brush with egg glaze (the yolk + 1tsp water) and sprinkle with poppy seeds and sunflower seeds.

18. Bake in preheated oven for 25 minutes or until richly golden and hollow-sounding when tapped underneath.
19. Cool on a wire rack.

[ORIGINAL BLOG] Remarks:
If the dough is too dry add some more milk or ricotta cheese, but if on the contrary it is too wet, then add more flour, one tablespoon at a time.

Don’t add too much flour though; the dough should not be too dry, but soft.
Any seed of your choice will be fine for sprinkling the rolls.
While the bread bakes, check that the crust doesn't get too brown. If it's the case, then lower the temperature to 160° C.

Enjoy;
Lauren x

Sunday, January 15, 2012

{VERY Healthy Dessert - Sweet Potato Pie}

Well, by now you obviously know I am fasting at the moment, and I had a brain wave for a 'dessert' the other night. I made version one last week, but burned the crust and therefore couldn't get a good idea of the taste and certainly wasn't going to take photos of it like that.

So, today I made version two.....and was SO happy with the result. This is a dairy free, wheat free and artificial sugar free Pie.

INGREDIENTS:
Crust
- 250g nuts (I used 100g cashews, 100g cashews & 50 g walnuts)
- 2 heaped dessert spoons of nut butter (you can buy all sorts of varieties in the health food isle)
- 2 dessert spoons of maple syrup (could use honey)

Filling
- 3 sweet potato (could substitute for pumpkin)
- 1 banana
- approx 80g apple sauce (the jar I had in the fridge had grown into a science experiment [eww] so I used a long life apple raspberry puree I had in the pantry which was 80g - about 1/2 cup)
- 1 dessert spoon of chia seeds (these are very healthy and act as a thickener - more info here)
- 1 dessert spoon cinnamon
- 1 tsp nutmeg
- 1 tsp ground cloves
- 1/4 cup of natural maple syrup (not flavoured syrup or honey)


METHOD:
1. Peal, chop and steam the sweet potato
2. Preheat oven to 150'C
3. In your food processor, grind up the nuts until resembling crumbs. Add the nut butter and maple syrup until it rolls into a ball in the processor and combines nicely.
4. Press into a flan/ tart tin and press into the base and sides to make a pastry-like base.
5. Place in the oven for about 15 mins or until golden. Keep an eye on it, (because time got away from me the first time I made it).
6. Place the sweet potato (once cooked and soft) into the food processor a bit at a time until smooth (don't worry about rinsing it after making the base crust, the ingredients blend together well).
7. Add the other ingredients into the smooth sweet potato mixture and blend together.
8. Place the mixture into the nut crust base.
9. Turn the oven off and place the finished pie into the "dead oven" and allow to 'bake' for about 10 minutes or until filling is firm.


Slice up and serve with fresh berries, pear or other seasonal fruit.
For those fasting, on restrictive diets or those that love healthy food, this is a real treat!

I took it to a family dinner as a substitute for dessert for myself. One person loved the crust, but wasn't keen on the filling (would probably have to add brown sugar or something to the filling to satisfy that one). MANY loved it and I got a lot of positive comments about the attempt to make such a healthy and guilt free dessert. When you haven't had ANY sugar in 2 weeks, it is quite a nice treat!

Lauren x

Monday, October 24, 2011

{No Bake Healthy Sweet Treats}

I found this website last night and went into my sort of "chefs coma".
What's that you ask?!
It's when you completely zone out and that mostly happens with a good cookbook, a foodie magazine or a blog etc.... These 'episodes' (lol) are characterized by lots of flipping, making mental notes, making bookmarks of recipes to try, gushing over the spectacular photography and planning future events just so you can use that recipe!

This blog is called "The Blender Girl" and you should read her story - it's fascinating.
I love her food philosophy and think society could get a long way by incorporating some of these types of recipes into our diet. No processed foods, no bad fats but lots of good food as nature intended it.

So I just made my first "blender girl" recipe. I started with her 'raw vegan chocolate fruit balls'


I didn't have all the exact ingredients and added some extras - so here is my take on Tess' recipe.


Ingredients (made about 16 balls)
1 cup mixed raw nuts (I used 1cup of cashews)
1/2 cup pitted chopped dates
1/2 cup dried chopped apricots
1/2 cup raisins
2 Tbsp unsweetened cocoa powder
1 Tbsp fresh orange juice (I only had apple on hand)
a couple of drops – 1/8 tsp of natural almond essence (I used vanilla)
I added 2 tbl LSA and a small squirt of honey

1/2 tsp cinnamon
1/4 cup desiccated coconut

Method
Mix the coconut and cinnamon in a small bowl and set aside for rolling.
Put all other ingredients in a food processor, and slowly add in the orange juice if it doesn’t bind together completely.
Roll into small balls and coat with the coconut mixture.
Store in a sealed glass container in the fridge.


I have to say these are delicious and I was thrilled with the result. Took a minute to prepare and it's great having them in the fridge to satisfy the sweet tooth.

Enjoy;


Lauren X


- Posted using BlogPress from my iPad

Tuesday, August 30, 2011

{Freezer Meals & Making Life Organised}


You can tell spring is coming, the cleaning bug has hit (but maybe for me its an all year round thing). I cleaned out my freezer, did an inventory and created space.
I ashamedly had to remove a few 'mystery packages' too. This means unlabeled food which, knowing my label obsession, I clearly lost my mind before putting in there in the first place.


I was armed with my sharpie, big ziplock bags and foil trays with lids. Then I did a big food shop, put little munchkin to bed, left big munchkin with Lego and got into the kitchen.

I prepared a whole lot of meals that are easy to reheat and then all I have to focus on is adding fresh veggies and salads etc... To the main dish.

So what dishes did I make?

*Leek and Mushroom Risotto
When I defrost, I will add sone fresh parsley, Parmesan and pepper.

*Sweedish Meatballs
These were inspired by the ones I love at ikea. So all I have to do is add green veggies (like beans, asparagus and broccoli), gravy, cranberry sauce and mashed potato (could even freeze this, but I like fresh).

*Lasagna and 'Spag Bol'
I did a BIG batch of Italian style mince. Using foil trays with lids (woolies sell these in packets of 2) I made 2 lasagnas and put the other half of the mixture into a zip lock bag for 'Spag Bol'.

*Schnitzels / nuggets
I crumbed up 1 kg of chicken breast. I cut each Breast into half to get two thin schnitzels per breast. Any of the tenderloins I crumbed and packed separately as nuggets.

*Beef Burritos
I made up sone Mexican style mince. Add garlic, red onion, Mexican chilling powder (no additive and salt version of taco seasoning), corn, capsicums, mushrooms, coriander and a tin of diced/ pureed tomato.
Place into tortillas, fold up tortilla, wrap in double glad wrap and place all in a zip lock bag. Take one out and microwave for individual serve or use all and bake as normal 'enchilada style'.

*Teriyaki style Chicken
This was easy, I just filled a zip lock bag with soy sauce, some brown sugar, sweet chili sauce and kecap manais. Then put in chunks of chicken raw and freeze. This marinades it before cooking.
Serve with an Asian green stir fry and rice.

*Beef Curry
Similar to above, cut beef up and add into the bag with curry paste.
Add peas or preferred veggies when cooking and serve with rice and naan bread.

*Shredded BBQ chicken.
I got a free range bbq chicken and took all the meat off so I can use it in things like omelets quiches, pies, etc... Without much effort!


I realize zip lock bags aren't very 'green' but for me they work, because they store a big meal in a flat bag, making the most out of freezer space.
Just take a meal out of freezer and put it into the fridge at night it should be mostly defrosted by the next night's dinner time (depending on the dish). SO simple.

So that's my overview of my very productive day.
I am keen to try and keep this up as it is one busy day that has made the next 10 -15 meals preparation free!!! Love that!!!


Lauren x


- Posted using BlogPress from my iPhone

Sunday, May 1, 2011

{Cinamon Scrolls : A naughty but delicious treat!}

I made these for an afternoon tea meeting yesterday and have to say, that they went down a treat. I am definitley a healthy eater, as are my family. So, when we make these kinds of foods they are for a treat or to share with people. It was a rainy and miserable day weather wise - so hot cinnamon scrolls seemed just the thing! This isn't exactly a quick recipe, but definitley easy!


Dough Ingredients
1 sachet of Tandaco yeast (7g)
3 1/2 cups plain flour
1 tsp salt
1/4 cup sugar
1 tsp ground cinamon
1/2 tsp mixed spice
1 cup warm milk
2 tsp melted butter
1 egg, lightly beaten
1 tbsp milk to brush

Filling
1 cup brown sugar
1/3 cup butter/ margarine
1 tsp vanilla

optional : 1/3 cup of walnuts, pecans or other nuts of choice (can add less or more to taste).

Recipe:
1. Sift flours into a bowl and add all dry ingredients.
2. Add milk butter and egg and mix to form a smooth dough. Knead for about 10 minutes untill smooth and elastic.
3. Place in a greased bowl (spray inside with a spray oil), cover with towel and set in a warm place for an hour untill it doubles in size.
4. Knock down dough (punch with fist in centre) then knead for a minute.
5. Roll out into a rectangle shape, this may take some time but try to get it out to a decent size rectangle about 1-2 cm or so thick.
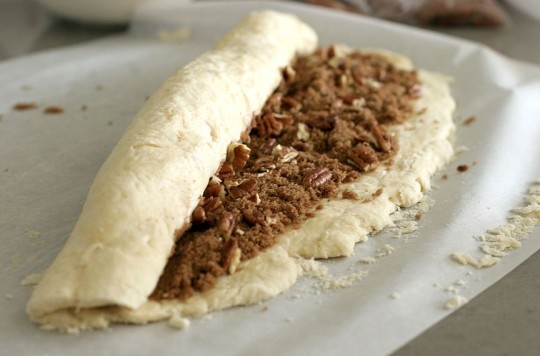
6. Cream the butter, sugar and vanilla together to form the filling. Spread on the rectangle of dough and sprinkle nuts on top (if using).
7. Roll the dough length ways so you end up with a long 'sausage-like' log. You can stretch out the log slightly and gently to make it longer at this stage. Cut in half with a sharp knife so not to squish the log flat. Continue cutting each half in half so all sections stay even.
8. Pre-heat oven to 200'C
9. Grease a pan and place the scrolls closley side by side (like you would with scones) so they support each other as they cook. Set aside in warm place for about 30 minutes to rise again.
10. Brush with a little milk and bake for 20-25 mins. Cool slightly and then serve whilst warm, DEEELISH!!!

Some recipes call for icing which you could add once cooled, but I think this is sweet enough on its own and the filling melts to create a sort of a glaze-sauce anyway.


Thursday, January 27, 2011

Delicious Falafel

Sorry for being quiet on the blog front, we have had a busy week or two around here and there are some sewing projects I am working on too.
DON'T forget to enter the Lime Light Giveaway also as it's drawn on the 30th ;)


Recently I have had a few people asking for my Falafel recipe so I tried to remember how I do it (I don't use a recipe, so each batch may be slightly different but componants are the same).


INGREDIENTS:

1 onion

3 cloves of garlic (ish depending on size, but we like our garlic too)
2 heaped tsp ground cummin
2 heaped tsp ground corriander

1 tsp of ground cardomom
2 cans of chick peas
1 bunch corriander

salt and pepper

1/3 cup rice flour (can substitute plain or chick pea flour also)


METHOD
1. In fry pan, fry dry spices first with NO oil to release aroma slightly.
2. Add a little olive oil or vegetable oil with onion and garlic and cook on medium heat untill onions are transperant.
3. Drain and add chick peas to your food processser with onion mixture.
4. Blitz until smooth
5. Add a handful of fresh corriander and the salt and pepper (not much required)
6. Remove mixture into a bowl and gently mix through the rice flour. 7. Chill mixture for about 1/2 hour or so (optional, just allows mixture to set better)
8. Roll into small balls, sprinkle with sesame seeds (optional) and put onto an oven tray and bake at 180' until golden (usually about 20 minutes in my oven).

Best served HOT and we usually eat in a mountain bread wrap with homemade hummus, homemade tabouli and avacado.

Enjoy adding this meat free meal to your family menu, we do!

Lauren x

Thursday, December 16, 2010

{12 Days of Christmas ::: Day 4} Baileys Fudge

(recipe via taste.com.au)


Two years ago, I made this Baileys fudge and they were VERY popular!!! I have had requests for it again. Once the fudge set, I used a small (bite-sized) star shaped cookie cutter to cut out and arranged on a plate in a pyramid/ chritmas tree shape. This makes a wonderful gift and anyone would love to unwrap these.

Ingredients

Melted butter, to grease
1 x 395g can sweetened condensed milk
100g butter, cubed
255g (1 1/4 cups) brown sugar, firmly packed
2 tbs glucose syrup
150g good-quality dark chocolate, finely chopped
60ml (1/4 cup) Baileys Original Irish Cream liqueur

Method

  1. Brush a 20cm (base measurement) square cake pan with melted butter to lightly grease. Line base and 2 opposite sides with non-stick baking paper, allowing it to overhang.

  2. Combine the condensed milk, butter, sugar and glucose syrup in a medium heavy-based saucepan. Stir over medium-low heat for 3 minutes or until sugar dissolves. Increase heat to medium-high and cook, stirring constantly, for 10-15 minutes or until mixture thickens, turns a caramel colour and leaves the side of pan. Remove from heat.

  3. Add the chocolate and liqueur, and stir until chocolate melts and mixture is smooth. Pour into the prepared pan and smooth the surface. Set aside for 1 hour to cool. Cover with plastic wrap and place in the fridge for 1 hour or until firm.

  4. Remove fudge from pan, using the paper to help lift the fudge. Use a sharp knife to cut fudge into 16 equal portions.


Enjoy;
Lauren x

Sunday, December 12, 2010

{12 Days of Christmas ::: Day 1} Almond& Rosewater Shortbread and a Guava Mocktail

Well, I have had a hectic few weeks in my little world. Not much crafting or cooking or anything like that as I have finally settled into our new house. I love the kitchen and it is such a feature, will have to share a pic soon.

But now that I have found my power cord to my lap top, I am now free to start sharing some festive inspiration as we all approach my favourite time of year - the very busy season of Christmas.
We have 12 days till Christmas so, here is DAY ONE. I thought I would share 2 yummy festive treats for my first post back after the move. The first of these treats is what I Christened my new oven and my new Kitchen Aid with and it is simple and delicious ;)
Almond and Rosewater Shortbread I loved this (and so did my girlfriends I had over for a craft night recently). I also had all ingredients except for the rice flour on hand in the pantry, so adding that to my shopping list for $1.30 meant this was very economical. I doubled the batch it was so delcious. This would also make a wonderful gift for school teachers, just bag or box up nicley and done!


Oil spray to grease tray or baking paper
180g soft butter

125g (3/4 cup) icing sugar mixture, sifted

1 x 100g pkt almond meal

115g (3/4 cup) plain flour

45g (1/4 cup) white rice flour

1/4 tsp ground cloves

1 tbs rosewater essence
About 3/4 cup icing sugar mixture, extra, to dust
(i didn't need that much, but use how much you like here).

Method
  1. Preheat oven to 160°C.

  2. Spay 2 baking trays with oil to lightly grease or lay with baking paper.

  3. Use an electric beater to beat together the butter and icing sugar mixture in a bowl until pale and creamy.

  4. Add the almond meal and sift over the flours and ground cloves. Stir until well combined.

  5. Use your hands to roll heaped tablespoonsful of mixture into 8cm long logs. Roll them into a ball first and then roll the logs so the ends are nice and rounded. Shape into crescents and place on prepared trays. THe mixture does spread so make sure to leave a few cm between them. I did try a few different designs (hearts, logs and crescents) but the mixture doesn't hold shape very well do do hearts, but the logs and crescents worked well.

  6. Bake in preheated oven, for 20 minutes or until cooked through and light golden. Remove from oven.

  7. Lightly brush shortbreads with rosewater essence and set aside on trays for 30 minutes to cool and firm.

  8. Dust shortbreads with extra icing sugar.

  9. Set aside for a further 30 minutes or until completely cool.


Guava, passionfruit and lime mocktail
I love this drink, as you can have all ingredients on hand and they last for a while in pantry which means you can shop ahead of time for this one too. It's a delcious and festive drink that adds something special.For an extra nice touch, pre-chill champagne or martini glasses in the fridge and serve in them as your guests arrive :)


Fresh limes cut into small wedges
1 tin of passionfruit (or fresh if in season)
1 bottle of Guava nectar
1 bottle of soda water
Ice
Strawberries and mint leaves to serve (if desired)

1. Put ice cubes into glass
2. Squeeze lime wedge into glass and put the whole wedge into the glass

3. Put a teaspoon of passionfuit pulp in glass
4. Pour Guava nectar into glass till about 1/3 full

5. Top up with soda water

6. Push a fresh strawberry onto side of glass to garnish if desired.
7. If you want a minty touch to it, just rip a mint leave in half (to realease aroma) and place in glass.

Enjoy;
Lauren x

Saturday, November 20, 2010

Delicious Brownies!


The best brownie recipe in my opinion is below. Compiled from a few different recipes and based on an old recipe card I found here is the base recipe:
  • 200g dark chocolate, chopped
  • 125g butter, chopped
  • 1 cup (200g) brown sugar
  • 2 eggs, lightly whisked
  • 1/2 cup (75g) plain flour
  • 1/4 cup (40g) self-raising flour
  • 2 tbs cocoa powder
  • 1/2 cup (125g) sour cream
Method:
  1. Preheat oven to 180°C. Grease and line a square cake pan with baking paper.

  2. Put the dark chocolate and butter in a saucepan on low. Keep stirring for a few minutes until chocolate and butter are melted and silky. Remove from heat and set aside for 2-5 minutes to cool.

  3. Add the sugar and eggs to the chocolate mixture and stir to combine.

  4. Add the combined flours and cocoa powder and stir to combine.

  5. Add the sour cream and stir to combine. Pour mixture into your dish.

  6. Bake in the preheated oven for 25 minutes or until brownie is still slightly spongey and gooey. Turn oven off and leave brownie cooling in oven.

After the sour cream, feel free to add extra's for a more delicious touch:

1. 100g of chopped dark choc or choc chips and 50-70g walnuts (depending on your taste).
2. 200g of crunchy peanut butter.
3. 70g macadamias chopped and 1 cup of white choc chopped or chips.
4. A few Tbls of Baileys (depending on taste).


If you try this with one of the extra's (I have only tried number 1 and number 4 so far), I would love to hear from you. These would even make a great homemade gift for someone, just add christmas wrapping touches for preschool/ school teachers or coaches etc....

Enjoy,
Lauren X


Monday, November 1, 2010

A delicious twist on an old favourite.


Today I have made a giant lasange as we are having friends over for dinner. How do you make lasagne different you ask??? Instead of a normal plain white sauce, making a roasted garlic white sauce instead!


1. Heat oven to about 200'C

2. Wrap a whole bulb of garlic in foil (you can add a dash of oil and S&P, but not necessary).

3. Place into the oven and slowly roast untill it's soft. It took me about 20 mins to do this, but it depends on your oven.
4. Remove from foil and set aside to cool.

5. By hand, remove a garlic clove one at a time and squish the insides into a bowl. Once all the gooey garlic is in the bowl, smoosh (a technical term - lol) with a fork.
6. Make your bechamel sauce as per normal ( have a look here for a recipe).
7. when mixing and whisking it through, add the mashed roasted garlic.

8. Then assemble your lasagne as per normal.


Enjoy,


Lauren x


Saturday, October 9, 2010

Appologies if you love this like I do!


Ever had a craving for chocolate or pudding pudding while you are watching a favourite tv show at night? Sometimes though, the idea of 'throwing together' a chocolate cake and actually waiting for it to cook puts you off. Well, here comes the appology. I am sorry folks, with this post you are now 5 minutes away from individual size
chocoalte cakes/ puddings.


Chocoalte Cake in a Mug:
4 tablespoons flour
4 tablespoons sugar
2 tablespoons cocoa

1 egg
3 tablespoons milk
3 tablespoons oil

3 tablespoons chocolate chips (optional)
A small splash of vanilla extract
1 large coffee mug

Add dry ingredients to mug, and mix well. Add the egg and mix thoroughly.
Pour in the milk and oil and mix well.
Add the chocolate chips (if using) and vanilla extract, and mix again.

Put your mug in the microwave and cook for 3 minutes at 1000 watts (high). The cake will rise over the top of the mug, but don't be alarmed! Allow to cool a little, and tip out onto a plate if desired.

EAT! (this can serve 2 if you want to feel slightly more virtuous).


My cake was slightly dry (but still delicious) so in my microwave I would cut the cooking time down to 2.5 minute and maybe see where it is at that point next time. We topped it off with icecream, but i would love to play around with the flavours. I reckon you could add lots off extras to change the flavours to choc cherry, choc caramel, choc baileys or choc mint maybe??? Mmmmmm.....YUM!

Enjoy;
Lauren x

LinkWithin

Related Posts with Thumbnails