Showing posts with label fabrics. Show all posts

Wednesday, October 5, 2011

{Bib and Nappy Mat/ Storage Wallet}

My beautiful cousin (in-law) is expecting a beautiful baby girl in a few weeks. I am very excited for her and now that I have given the gift to her in person, I can share it on here.

I had some beautiful girls fabric I bought previously and I wanted to use it for this project.

So I made a bib and a nappy change mat with storage compartments for her. Nothing like practical and pretty! I love this idea so much and would make one for me if I wasn't about to head out of nappies (YAY!!!)


The teddy is the closest thing I have to a doll in a boy house to show you how the mat works and how the bib sits.


This 'crinkley' heart is stuffed with a cellophane type material and built in so that the baby has something to play with whilst Mummy is trying to wrangle a new nappy onto a little bubba.


I took these photos before I attached the tie on the end and so that is missing on here.


Both projects were manageable even for a beginner.

Bib
1. Trace a bib pattern from one or there are a few online you can find if you don't have one on hand.
2. Pin right sides together.
3. Make sure you place the string/ ribbon to tie it up inside the bib, leaving a little out to anchor it and the length inside. You can also use velcro after you've turned it instead.
4. Sew around the edge leaving a little gap (back stitched) to turn inside.
5. Turn out the right way and top stitch around the edge making sure you enclose the gap you left to turn it out.


Nappy Mat
1. Measure out your two rectangles
2. Sew face side of fabric together with a gap on the side (back stitched) to turn right side out.
3. Iron flat
4. Measure size of pocket and fold and pin in place. Top stitch around edge using a decorative stitch (don't forget to put the ribbon and toy in the pocket fold if doing so).
5. Sew a divider in the center of the pocket for nappy and wipes case.
6. Sew a ribbon, some velcro or something to fasten and hold together.

Enjoy,
Lauren x

p.s. I hope you like the new blog logo! I have felt like a change for a while but waited for the right idea. I loved the toffee apple as it is a mix of healthy and sweet. We eat healthy here, but as someone who enjoys baking, treats are a fun thing to enjoy.

Thursday, August 25, 2011

{Christmas 4 month countdown}

My favourite time of year is quickly approaching. Sorry if I scare you by mentioning the "Christmas" word too early. I am not a quickly shop on midnight Christmas eve kinda gal.

I like organisation.
I like order.
I like planing.
I am a list queeen!

So i have lists going on ages before the 25th of December. Lists of gifts, menus, shopping lists, time line to-do lists, lists for anything! So, yesterday as the 4 month mark arrived, I found some pretties online and swooned for a while.

In my 12 days of Christmas countdown last year I dedicated a post to the beautiful advent calendar.
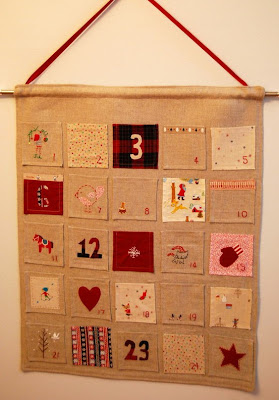
I have been re-inspired from Pinterest and with 4 months to go until Christmas I have plenty of time to plan ahead and make one for us this year. Now to decide on the design. I want to do it in fabric so that it is something that will last and I can pass on. This is just the tip of the iceberg though....there are so many homemade Christmas decorations I want to do this year, better get planning ;)

Linaloo

Inchmark


Green Jello


Frugal Home Designs


Ucreate (guest post by wippleberry)


The House of Smiths

There were so many other pictures and eye candy I could post.....so if you want some inspiration for this (or anything) get onto pinterest!

I would love to know if you created an advent calendar idea at your place and what kind of design you have, please link it up in the comments or on the facebook page if you have ;)

Lauren x


Monday, August 8, 2011

{Guest Blogger from PLAID : Pinwheel Tutorial}


Here is a wonderful guest post from the very creative Kerryn from the newly published "Plaid" blog. Her blog is new so pop over to it and have a browse at her very crafty ideas and cute kids too ;) She wrote a fresh never-before-seen tutorial written for you and I have been very excited to share it with you! Here it is:


Thanks Lauren for having me here today at your fantastic blog!

I have been reminded recently of how beautiful and sweet pinwheels are. So, I decided to make a few and see what could be done with them. After seeing how easy they are to make I have decided that they will be the theme for my daughter's birthday party in October.

So, let's get to it...

To make a pinwheel you need the following supplies...
- scrap fabric
- fusible webbing
- iron
- fabric scissors
- hot glue gun or other glue
- bamboo skewer


If you’d like to put your pinwheel onto a card then you’ll also need...
- Card stock
- Stamps, ink, glue, buttons etc


1. Grab your fabric scraps and fusible webbing cut out 5cm squares of all

2. Fuse the webbing onto the wrong side of one of the fabrics, wait for it to cool, peel off the paper backing and fuse it to the wrong side of the second fabric. Trim away any frayed edges and you will be left with this...


3. Cut 4 slits in the square starting from each point on the square. This doesn't have to be too exact, just make sure there is a section in the centre of the square in-tact.


4. Trim away a small section of the corners. This will make sure the centre of your pinwheel is neat.

5. Get your glue gun and place a dot of glue in the centre. Take one of the trimmed corners and glue to the centre of the square. Repeat this for all 4 trimmed corners using a dab of glue each time.


6. Cut off a section of the bamboo skewer and glue it to the back of the pinwheel. You can finish the pinwheel off with a cute button.


7. Now get some matching cardstock out and embelish / cut / stamp away until your happy, then glue the pinwheel on. I have used tombow craft glue to attach the pinwheel.

Ta Da!!! One very cute pinwheel card...


Now go forth and make pinwheels :)

Thanks again Lauren for having me here today!

Your welcome Kerryn. Thanks for sharing that gorgeus pinwheel tutorial! I am definintley going to try some soon ;)

Friday, July 15, 2011

{A Nap Time Sewing Project} Handbag for a princess

My little Mr 5 has a party to go to on Sunday for a little girl whom he quite likes and they go to prep school together. Actually they first met when they were in Mum's group at 6 week old's and they re-met this year.

So, I had some fabric laying around and wanted to make her something special. I have been looking for a nice handbag pattern for ages and when I found this one, I just knew it would turn the fabric into a perfect gift for his little 'girl' friend.

I first stumbled on Made By Rae when she started a theme on her blog called "Celebrate the Boy"....as a sometimes crafty Mum of two boys, I was very interested! So I printed off her pattern for this Buttercup Bag and started cutting. It was a very easy pattern to follow and the steps and diagrams make this very easy! Here are some photos of the finished project. I also bought some more fabric today so I can re-make it for me ;)


Enjoy;
Lauren x

Friday, February 11, 2011

{Giving Fabric Scraps a Second Life}


A couple of nights ago, I waa in a crafty mood (as I often am). This time however, I didn't feel like retreating to my desk and sewing machine or other crafty goods. I felt like sitting on the couch next to my man and doing something like hand stitching. I bought my sewing box down and some fabric scraps and before I knew it i had created a red felt backed fabric flower. I ended up making several and I turned teh first one into a ring which I LOVE. YOU can buy jewellery findings at your local craft store or from online craft supplies stores such as Craftumi.

Then, because I wanted one to wear out (but red wasn't the right colour) I made myself a black one too. This one is a little more dressy because its got more fabric on it and has a layer of black tulle (which I had left over from a headband I made last year) on the bottom which adds a really cool emement which I love.

What a cool way to use up some fabric scraps and add a awesome accessory to yoru wardrobe (what girl doesn't love some cool handmade accessories).

Tips:
1. Your cutting doesn't have to be exact, the look is quite rustic and it doesn't need to be perfect. It actually looks better with a few little imperfections.
2. Choose a good glue. I used a combination of hot glue and "gem glue".
3. Once flower is glued to the ring base, cut a seperate felt circle that has a slit in the middle. Pop it over the under-side of the ring sliding the slit over the ring and glue it on. It makes it look more finished and hides any imperfections and threaded knots on the bottom.


Enjoy;
Lauren x

Thursday, July 8, 2010

Oh My - I want!!!!


I saw this post on
The Pleated Poppy. I fell in love with this post and SO want to make some little pouches to organise my handbag! GORGEOUS! Gosh, SO many crafty projects to do :)


Enjoy;
Lauren x

LinkWithin

Related Posts with Thumbnails